Road to Revival: Servicing the Forks

Whilst the bike was in pieces, we took the opportunity to fit new oil seals to the forks and change the fork oil . There was some misting on one of the forks and who knows when the oil was last changed (if ever!).

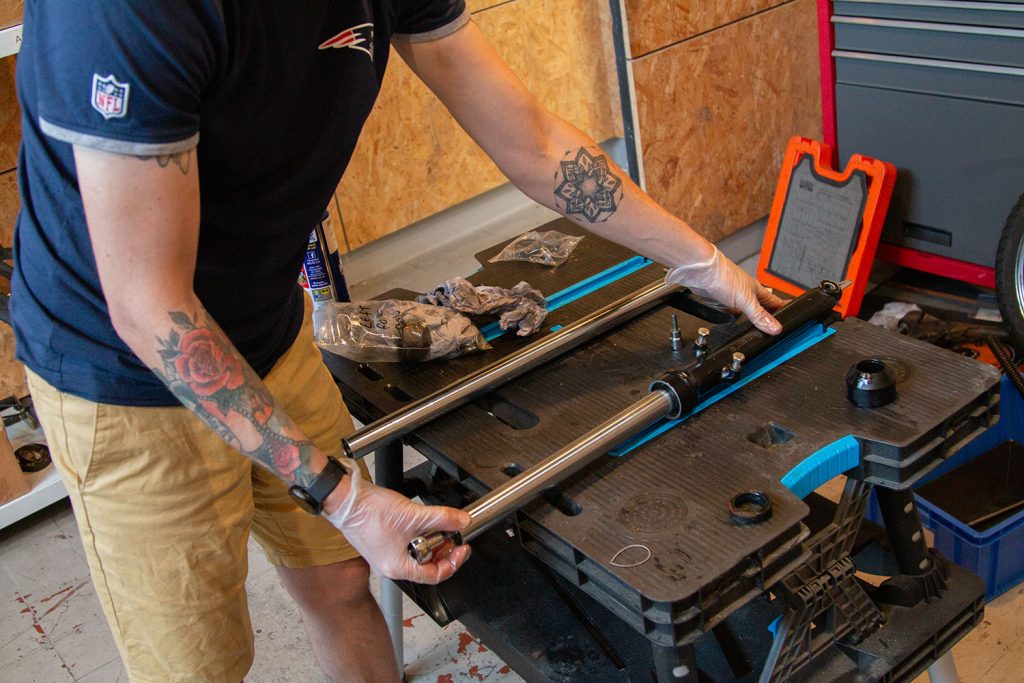
We took out the front wheel spindle and the four bolts holding the mudguard on, in order to get the forks separated.
Disassembling the Fork

First off, we removed the fork cap with a 22mm socket.

This allowed us to remove the spacer, fork spring, washer and drain the old oil. It smelt disgusting! So I highly doubt this has ever been changed!
Using a 10mm Allen key, we loosened the damper rod bolt - rather than buying a specialist tool for holding the damper rod in place, we used a few extension bars fitted together to do the same job. It worked a treat!

Out comes the damper rod
And a pretty sludgy spacer...

The retaining clip had seen better days.

We had a fun time getting the oil seal out - between a few different seal pullers, we eventually managed to get it out!

With all the fork components separated, we cleaned up the stanchion with a fine 0000 steel wool. There was a little pitting, but they weren't too bad.

Reassembling the Fork
With the other components cleaned, we could begin reassembly.
We inserted the spacer and damper rod back into the stanchion. Using the extension bar, we held the damper rod in place and refitted the damper rod bolt with a 10mm Allen key. This needs to be torqued to 24Nm.

It is worth using a plastic bag to protect the seal from the metal edge of the stanchion whilst you are sliding it into position. You wouldn't want to nick a brand new seal!

Using a fork seal driver, we seated the new oil seal. You'll know it is fully seated when the retaining clip snaps easily into it's groove. If it doesn't you can guarantee you haven't driven your oil seal in enough.

The retaining clip snaps into place - that is a satisfying sound!

We filled the fork with 168ml of 5W Motul fork oil. The oil you need may vary, depending on manufacturer specification and your preference. See our full range of fork oil here.


Next came the fork spring, spacer and washer. At this point, it is important to stroke the fork several times to expel any air in the oil. Pulling the stanchion upwards to the top of its travel will make it easier to fit the fork cap.

We torqued the fork cap to 45Nm - this is a lot easier to do once the forks are in the triple clamp! We'll double check it once the bike is in one piece. We slid the dust seal back on and the fork was sorted.

Ta-da! A complete fork with a new oil seal and oil! Now to do the other side...
Next Steps
With both forks refurbished, we could work on cleaning up the engine ahead of putting it back into the frame. Check out the other articles in our Road to Revival here.
- September 2023
- August 2023
- July 2023
- April 2023
- November 2022
- October 2022
- September 2022
- August 2022
- December 2021
- November 2021
- October 2021
- September 2021
- August 2021
- July 2021
- June 2021
- May 2021
- April 2021
- March 2021
- February 2021
- January 2021
- November 2019
- October 2019
- May 2019
- April 2019
- March 2019
- February 2019
- January 2019
- October 2018
- August 2018
- March 2018
- October 2017
- April 2017
- March 2017
- motorcycle battery
- how to guides
- motorcycle battery guides
- motorcycle licence
- bike licence
- cbt training
- beginner riders
- best motorcycles for beginners
- 300cc motorbike
- best 125cc motorcycles
- learning to ride
- articles
- sponsorship
- chain lube
- motul
- motorex
- wd-40
- servicing
- batteries
- electrical
- guides
- technical
- motorcycle racing
- track days
- novice racing
- amateur racing
- motorcycle race days
- track preparation
- best bikes
- motorcycles
- commuting
- top bikes
- best learner 125s
- 300cc motorcycles
- 300cc bike
- motorcycle exhausts
- motorbike exhausts
- aftermarket exhausts
- track gear
- race gear
- motorcycle gear
- weird motorcycle facts
- crazy motorcycle
- cool facts motorcycle
- motorcycle coolant
- motorcycle antifreeze
- motorcycle cooling
- track bike
- track bike build
- motorcycle mot
- mot test
- mot inspection
- speedway
- motorcycle ergonomics
- levers and pedals
- motorcycle seats
- brake and clutch levers
- riding position
- handlebars and risers
- ethanol
- fuel additive
- fuel degradation
- phase separation
- friction modifiers
- motorcycle oil
- oil additives
- motorcycle tyres
- radial tyres
- cross-ply tyres
- tread pattern
- aspect ratio
- load index
- speed rating
- tyre warmers
- tyre pressures
- service and maintenance
- motorcycle maintenance
- service schedule
- workshop practice
- motorcycle service
- winter riding gear
- waterproofs
- winter riding
- staying warm and dry
- winter maintenance
- corrosion protection
- winter storage
- motorcycle storage
- storing your motorcycle
- winter battery care
- looking after your battery over winter
- battery care and maintenance
- pre-ride checks
- oil levels
- basic motorcycle checks
- motorcycle brake discs
- wavy brake discs
